Few things ruin a night in your RV faster than a rig that rocks every time someone rolls over in bed or a trailer that feels like it’s tilting when you’re trying to cook breakfast. Whether you’re boondocking on uneven ground or parking at a perfectly paved campsite, having the right RV levelers, chocks, and stabilizers can make the difference between restless nights and peaceful sleep. The right gear not only keeps your camper stable and level but also protects your investment from long-term damage caused by uneven weight distribution.
This practical guide covers the essentials of RV leveling and stabilization for campers, trailers, and motorhomes. We’ll walk through the gear types, how to use them safely, and what to look for when buying. If you’re new to this, don’t worry—we’ll explain everything clearly so you can make confident decisions, whether you’re looking to quiet those nighttime squeaks or just want to avoid a fridge that won’t run right. For more must-have camper gear, check out our complete recommendations hub.
Why Leveling and Stabilizing Matter in Your RV
Leveling and stabilizing your RV isn’t just about comfort. An unlevel camper can cause a variety of issues, from doors that won’t close and beds that feel off-kilter to appliances that don’t work properly (most RV fridges require being level to function safely). Over time, parking on uneven ground can even stress your frame, slide-outs, and other components, leading to costly repairs. Proper stabilization also keeps your camper from rocking or swaying as people move around, which is especially important for light travel trailers and fifth wheels.
Leveling and stabilization are two distinct but related steps. Leveling ensures your RV is horizontally even, both side-to-side and front-to-back. Stabilizing comes after leveling and is meant to minimize movement once parked. Using the right combination of blocks, chocks, and stabilizers will give you a quiet, solid feel inside your RV—no more late-night wobbles.
Types of RV Levelers and When to Use Them
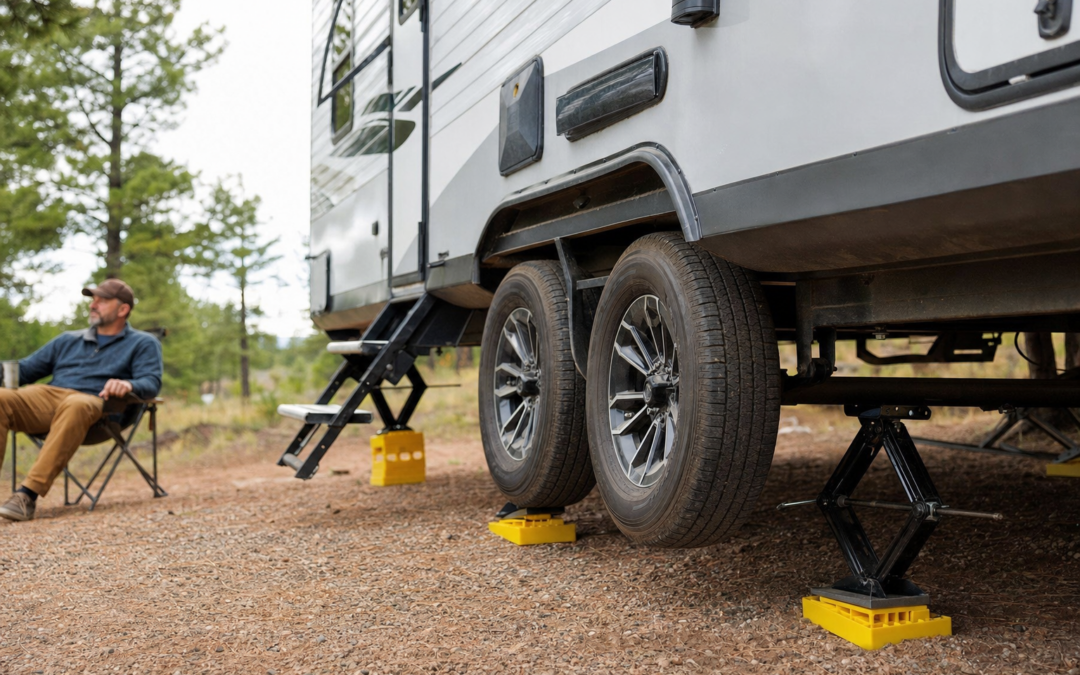
RV levelers come in a few main styles, each with its pros and cons. The most common are leveling blocks (also called pads or stackers), ramp-style levelers, and built-in hydraulic or electric leveling systems (found on some luxury models). For most towables and smaller rigs, portable blocks and ramps are the go-to solutions:
- Stackable Leveling Blocks: These plastic blocks (think giant Legos) are placed under your tires to raise one side or end of the RV. They’re lightweight, easy to store, and customizable for varying heights. Examples include the popular Lynx and Keltrion brands.
- Ramp-Style Levelers: These are wedge-shaped devices you drive onto, raising your RV smoothly to the desired height. They’re quick to use and especially handy for solo travelers, but aren’t always ideal for very soft ground.
- Permanent or Hydraulic Systems: High-end motorhomes may have push-button auto-leveling, but these are expensive and require professional installation. For most campers, portable solutions are far more cost-effective.
Choose your leveling method based on your RV weight, ground surface, and how often you move. For frequent campers, durability and speed of setup are key factors.

Keltrion RV Leveling Blocks Review — Keltrion levelers gear aimed at buyers who want clear specs before they click through. Key figures include 6, 6 , 12 .
How to Properly Level Your RV: Step-by-Step
Leveling your RV doesn’t have to be intimidating. Here’s a simple process you can follow at any campsite:
- 1. Check the Ground: Before parking, look for the flattest spot. Avoid soft, muddy, or deeply sloped areas if possible.
- 2. Position Your RV: Park your RV in its final position. If you’re using leveling blocks, line them up next to the wheels that need to be raised.
- 3. Use a Bubble Level: Place a small level on your floor or countertop (side-to-side and front-to-back). Identify which sides need to come up.
- 4. Stack or Place Leveling Blocks: For side-to-side leveling, put stacks of blocks under the low-side wheels. For front-to-back, use your tongue jack or front landing gear on blocks.
- 5. Drive or Lower Onto the Blocks: Gently move your RV onto the blocks, checking your level frequently. For trailers, you may need a spotter.
- 6. Chock the Wheels: Once level, place wheel chocks on both sides of at least one tire to prevent rolling.
- 7. Lower Stabilizers: After leveling and chocking, deploy your stabilizer jacks to reduce movement (never use stabilizers to level—they’re for stabilization only).
Take your time, especially the first few trips. The process gets faster with practice, and a well-leveled RV is worth the effort.
Wheel Chocks: Essential for Safety and Stability
Wheel chocks might seem like a small detail, but they’re critical for both safety and comfort. Chocks prevent your camper from shifting, especially on uneven ground or when unhooking from your tow vehicle. They’re your first line of defense against accidental rolling during setup or take-down.
- Types of Chocks: Basic wedge chocks are affordable and effective for most trailers. X-chocks fit between tandem tires and provide extra security and some stabilization.
- How Many Do You Need? At minimum, use one chock in front and one behind at least one wheel. For tandem-axle setups, chock both sides for peace of mind.
- Material Matters: Choose heavy-duty rubber or durable plastic chocks for longevity. Avoid lightweight, hollow chocks that can slip or break under pressure.
Always set your chocks before unhitching or lowering stabilizers. If you’re on a slope, consider carrying extra chocks or heavy-duty X-chocks for added security.
Stabilizer Jacks: Reducing Rock and Roll Inside
After leveling and chocking, the next step is stabilization. Stabilizer jacks are designed to minimize bounce and movement as you walk around inside the RV. They are not intended to lift your rig or serve as a substitute for leveling blocks.
- Types of Stabilizer Jacks: Most campers come with manual scissor jacks or drop-down stabilizers. Aftermarket options include tripod jacks for fifth wheels, stack jacks, and portable stabilizers for added support.
- Where to Place Them: Lower stabilizers at all four corners for best results. If your rig has a slide-out, consider extra support under the slide to reduce movement.
- Don’t Over-Tighten: Tighten jacks until they’re snug and the RV feels stable, but avoid lifting the frame—this can cause damage.
Adding stabilizer pads under your jacks can help distribute weight and prevent sinking on soft ground.

Lynx Levelers Including 1 Lynx Cap Level Top for Review — Tri-Lynx levelers gear aimed at buyers who want clear specs before they click through. Key figures include 40, 000 lbs, 11 Pack.
Choosing the Best Levelers, Chocks, and Stabilizers for Your RV
With hundreds of options on the market, narrowing down the right gear can be overwhelming. Here’s what to consider for each piece of equipment:
- Leveling Blocks: Look for models rated above your RV’s weight, made from UV-resistant material, and easy to stack. Larger packs are useful if you camp on uneven terrain often.
- Chocks: Choose heavy, non-slip chocks that match your tire size. Tandem-axle owners may benefit from X-chocks for superior hold.
- Stabilizers: If your RV didn’t come with stabilizer jacks, portable stack jacks or telescoping stabilizers are affordable and effective. Always check the rated capacity.
Brands like Lynx, Keltrion, and OULEME are widely trusted in the RV community and offer a range of kits for different needs. Read product reviews and consider your specific camper size and weight before buying.

Lynx Levelers Including 2 Lynx Cap Leveler Tops Review — Tri-Lynx levelers gear aimed at buyers who want clear specs before they click through. Key figures include 40, 000 lbs, 22 Pack.
Tips for Quieter Nights: Minimizing RV Sway and Noise
Even when your RV is technically “level,” unwanted motion and noise can disrupt your sleep. Here are practical steps to ensure quieter nights in your camper:
- Tighten Stabilizers Properly: Make sure all stabilizer jacks are snug, but not overly tight. Use a cordless drill with an adapter for faster setup.
- Add Extra Stabilization: For persistent rocking, try adding wheel stabilizers between tandem tires or using additional jack stands near the entry door or rear bumper.
- Check for Loose Components: Squeaks and rattles can come from loose steps, storage doors, or undercarriage parts. Tighten bolts and lubricate moving parts regularly.
- Use Rubber Pads or Mats: Placing rubber pads under stabilizer feet and leveling blocks can absorb vibration and reduce noise transfer, especially on concrete pads.
- Distribute Weight Evenly: A well-loaded RV is less prone to rocking. Store heavy items low and near the axles for best balance.
With a combination of the right gear and a few simple adjustments, you can enjoy restful nights wherever you park.
Common Mistakes to Avoid with RV Leveling and Stabilizing
Even experienced RVers can fall into bad habits that lead to instability or damage. Here are some mistakes to avoid:
- Using Stabilizers to Level: Never use stabilizer jacks to lift or level your RV—they’re for minimizing movement only. Level first with blocks or ramps.
- Under-Chocking Wheels: Skipping chocks or using too few is a major safety risk, especially on sloped sites. Always chock before unhitching.
- Over-Extending Jacks: Extending stabilizer jacks too far can reduce their effectiveness and cause instability. Use blocks or pads to minimize extension.
- Ignoring Weight Limits: Overloading blocks, chocks, or jacks can lead to failure. Always check the rated capacity and replace worn gear promptly.
- Not Rechecking After Setup: RVs can settle into soft ground or shift after setup. Double-check your level and stabilization after a few hours, especially in wet conditions.
Being mindful of these common pitfalls will help you set up faster and more safely every time.
Leveling and Stabilizing on Challenging Terrain
Not every campsite is perfectly flat. Here’s how to handle common challenges:
- Uneven or Sloped Sites: Carry extra leveling blocks to build up the low side. For steep slopes, consider repositioning rather than over-stacking blocks.
- Soft or Muddy Ground: Use wide, solid pads under blocks and jacks to prevent sinking. Avoid parking where water pools after rain.
- Gravel or Dirt Pads: Compact the ground under blocks and pads for better stability. Rubber mats can help prevent slipping.
- Urban Driveways: If parking at home, check for slight slopes and use wheel chocks even if you think the driveway is flat.
Always walk around your RV after setup and adjust as needed. If you notice excessive rocking or shifting, it’s worth taking the time to reset your gear.
Maintenance Tips for Levelers, Chocks, and Stabilizers
Like any gear, your leveling and stabilizing equipment will last longer with a little care:
- Clean After Use: Rinse off dirt and debris from blocks and chocks before storing. Let them dry fully to prevent mold or cracking.
- Inspect Regularly: Check for cracks, warping, or worn teeth on leveling blocks. Replace any gear that’s damaged or shows signs of stress.
- Lubricate Moving Parts: Spray stabilizer jack threads and moving parts with a dry lubricant to prevent rust and squeaks.
- Store Securely: Keep your gear in a dedicated storage bin or compartment. Avoid direct sun exposure for plastic blocks, which can degrade over time.
- Check Before Each Trip: Make a habit of inspecting all gear as part of your departure checklist.
Regular maintenance ensures your levelers and stabilizers are ready when you need them—and can save you from campsite headaches.

OULEME RV Leveling Blocks Review — OULEME levelers gear aimed at buyers who want clear specs before they click through. Key figures include 12, 10 , 8.5.
Frequently Asked Questions About RV Leveling and Stabilization
- Do I need to level my RV every time I park? For the best comfort and appliance function, yes—even on seemingly flat sites, small adjustments make a difference.
- What’s the difference between leveling and stabilizing? Leveling is adjusting your RV so it’s even; stabilizing minimizes movement after you’re level.
- Can I use wood blocks instead of commercial levelers? You can, but commercial levelers are usually lighter, more durable, and easier to stack. Wood can rot, split, or attract insects.
- How many leveling blocks do I need? Most RVers carry at least 10-12 blocks, but more may be needed for larger rigs or very uneven terrain.
- Do I need special stabilizers for slide-outs? Some RVers use slide-out supports for extra stability, but check your manufacturer’s recommendations—using them incorrectly can void warranties.
If you’re unsure about your specific setup, consult your RV owner’s manual or a trusted dealer for guidance.
Final Thoughts: Make Leveling Part of Your Setup Routine
Leveling and stabilizing your RV is one of the simplest ways to boost comfort, safety, and the lifespan of your camper. With the right combination of leveling blocks, wheel chocks, and stabilizer jacks, you’ll enjoy quieter nights and a more solid-feeling home on wheels—whether you’re camping in the mountains, by the beach, or in your own driveway.
Don’t be afraid to invest in quality gear or carry a few extra blocks and chocks “just in case.” It’s a small price to pay for years of stress-free camping. For more hands-on advice and the latest gear reviews, explore our camper gear recommendations before your next trip.
Common Mistakes to Avoid When Leveling and Stabilizing Your RV
- Using Stabilizer Jacks for Leveling: Stabilizer jacks are designed to minimize movement, not to lift or level your RV. Using them to level can damage your frame or the jacks themselves.
- Neglecting to Use Wheel Chocks: Always chock your wheels after leveling and before unhitching or deploying stabilizers. Skipping this step can lead to dangerous rolling.
- Overextending Jacks or Levelers: Extending jacks or levelers beyond their recommended limits can cause instability or mechanical failure.
- Ignoring Ground Conditions: Setting up on soft or uneven terrain without pads or blocks under your jacks can result in sinking or shifting over time.
- Failing to Double-Check Level: Even if you think your RV looks level, always confirm with a bubble level inside. Small tilts can cause big problems for appliances and comfort.
- Not Retightening Chocks: After settling or walking inside, recheck and retighten chocks and stabilizers as needed.
Avoiding these common mistakes helps ensure your leveling and stabilization routine is safe, effective, and protects your RV from unnecessary wear.
RV Leveling and Stabilizing Maintenance Tips
Proper maintenance of your leveling and stabilizing gear not only extends their lifespan but also ensures safe and efficient operation every trip. Here are some key maintenance practices:
- Clean Blocks and Ramps: After each use, remove dirt and debris from leveling blocks and ramps. Store them dry to prevent mold or cracking.
- Inspect Chocks and Stabilizers: Check for cracks, wear, or damage on chocks and stabilizer pads before each trip. Replace any components that show signs of failure.
- Lubricate Moving Parts: Apply a suitable lubricant to the moving parts of manual jacks and stabilizers a few times per season to prevent rust and ensure smooth operation.
- Check Fasteners: Tighten bolts, screws, and mounting hardware on stabilizers and leveling systems regularly, especially after long drives on rough roads.
- Test Auto-Leveling Systems: For RVs with electronic or hydraulic systems, cycle the system periodically during storage and before trips to ensure all components are functional.
- Store Gear Securely: Keep all leveling and stabilizing equipment in a designated storage area to prevent loss or damage. Avoid leaving plastic blocks in direct sunlight for extended periods to prevent UV degradation.
Routine checks and care will keep your equipment working reliably and help you avoid campsite surprises.
Quick-Reference RV Leveling & Stabilizing Checklist
- Scout for the flattest available campsite
- Position RV and check side-to-side level
- Place and stack leveling blocks or ramps as needed
- Drive or lower RV onto blocks
- Re-check level (side-to-side and front-to-back)
- Chock wheels securely
- Unhitch (if trailer) and adjust tongue jack/front landing gear
- Lower stabilizer jacks until snug (do not lift RV)
- Double-check stability inside RV
- Adjust as needed and enjoy your quiet, stable campsite!
Keep this checklist handy for each setup to streamline your process and reduce setup stress.
Frequently Asked Questions About RV Levelers and Stabilizers
Do I need both leveling blocks and stabilizer jacks?
Yes. Leveling blocks (or ramps) are used to get your RV even on uneven ground, while stabilizer jacks minimize movement after you’re level. Each serves a distinct purpose for safety and comfort.
Can I use wood instead of commercial leveling blocks?
While many RVers use wood planks in a pinch, commercial leveling blocks are stronger, lighter, and less likely to split or rot. If you use wood, ensure it’s thick, in good condition, and large enough to distribute weight safely.
How do I know if my RV is level?
Place a bubble level on a countertop or floor inside your RV, checking both side-to-side and front-to-back. Some RVers install permanent stick-on levels outside for quick reference.
Is it okay to leave stabilizers down during storage?
It’s generally not recommended, as leaving stabilizers extended for long periods may lead to corrosion or mechanical issues. Only deploy stabilizers when the RV is in use.
Why does my RV still shake after leveling and stabilizing?
Some movement is normal, especially in lighter trailers. For extra stability, use additional wheel chocks, stabilizer pads, or consider adding aftermarket stabilizer bars or cross braces.
How often should I inspect my leveling and stabilizing equipment?
Give your gear a quick check before every trip and a more thorough inspection at the start and end of each season. Look for wear, rust, and mechanical issues.
Proper leveling and stabilization are the foundation of a comfortable, safe RV experience. With the right equipment, knowledge, and a little routine care, you’ll enjoy quieter nights and less hassle at every campsite.