Dealing with your RV’s black and gray water tanks is one of those jobs every camper faces, but it doesn’t have to be messy or stressful. Having the right sewer hose and a reliable tote can make dump-station days much simpler, cleaner, and even a bit more routine. Whether you’re a full-timer or a weekend explorer, learning the basics and having a setup that works for your rig is key to a hassle-free experience.
This guide breaks down everything you need to know about RV sewer hoses, portable waste totes, and the essential accessories that make the whole process easier. We’ll also touch on related gear like levelers and coolers — items that round out your camper essentials and help you stay organized and comfortable during your travels. For a deeper dive into must-have items, our comprehensive camper gear hub offers more tips and recommendations.
Understanding Your RV Sewer System
Before you can confidently tackle dump-station days, it’s important to understand the basics of your RV’s waste system. Most RVs have two separate holding tanks: the gray water tank, which collects water from sinks and showers, and the black water tank, which stores waste from the toilet. Both tanks eventually need to be emptied at an approved dump station.
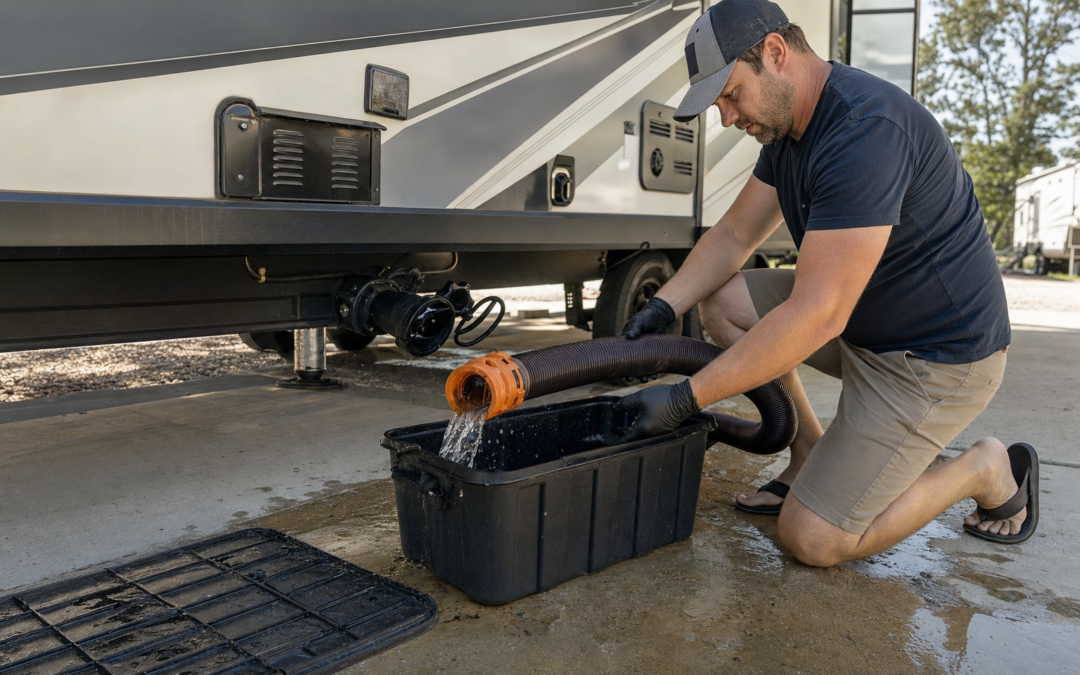
The process involves connecting a sewer hose from your RV’s outlet to the dump station inlet, draining the tanks (usually black first, then gray to help rinse), and then cleaning up. A portable waste tote adds flexibility by letting you empty tanks when you’re not near a dump station, which is especially helpful for longer boondocking stays or crowded campgrounds.
Choosing the Right RV Sewer Hose
Your sewer hose is the workhorse of waste management. Not all hoses are created equal — length, durability, and flexibility all matter. Most hoses come in 10- or 20-foot lengths; a longer hose gives you more reach at awkward dump stations, but a shorter hose is easier to store. Look for a hose made with heavy-duty, UV-resistant materials and sturdy end fittings that won’t leak under pressure.
Accordion-style hoses are popular for their ability to extend and collapse, but pay attention to wall thickness: thinner hoses are lighter but wear out faster, especially if dragged over rough ground. A clear elbow or adapter at the sewer end lets you see when the flow is finished, reducing the chance of a messy surprise.
- Key features to look for: Crush resistance, leak-proof fittings, easy storage, and compatibility with your RV’s sewer outlet.
- Pro tip: Store your sewer hose in a dedicated compartment or tote to keep it separate from drinking water equipment.
Portable Waste Totes: When and Why You Need One
If you camp at sites without full hookups or want to extend your stay without moving your whole RV, a portable waste tote is invaluable. These rolling tanks let you transfer waste from your RV to the dump station without breaking camp. Totes come in various sizes (typically 10 to 36 gallons) and feature sturdy wheels, built-in handles, and sometimes even integrated hose storage.
Choose a tote that matches your holding tank capacity and is easy to maneuver over uneven ground. Larger totes mean fewer trips, but they can be heavy when full. Make sure the tote’s fittings match your hose and RV outlet, and look for models with venting options for faster, splash-free dumping.
- Tip: Practice using your tote at home before your first trip so you’re comfortable with the process.
Dump Station Etiquette and Best Practices
Dump stations can get busy, especially on weekends. Good etiquette helps everyone get in and out quickly and keeps the area clean for the next user. Always wear disposable gloves, and keep a dedicated pair of shoes or boots for sewer chores. Connect your hose securely before opening your tank valves, and never leave a mess behind.
After emptying your tanks, use the dump station’s provided hose or your own to rinse your sewer hose and tote. Close all valves tightly, and check for leaks before stowing your gear. If there’s a line, pull forward as soon as you’re finished so others can access the station.
- Never use potable water hoses for rinsing sewer hoses or totes.
- If you spill, rinse the area thoroughly out of courtesy for the next camper.
Essential Accessories for Clean, Hassle-Free Dumping
A few simple add-ons can make your sewer chores safer and cleaner. Consider these must-have accessories:
- Disposable gloves: Nitrile or latex gloves are a must for every dump-station visit. Keep a box handy.
- Clear sewer elbows: These adapters let you see when tanks are empty and help prevent overflows.
- Hose supports: Sloping supports ensure a steady flow and less mess, especially on uneven ground.
- Dedicated cleaning hose: Use this only for rinsing out sewer hoses and totes — never for drinking water.
- Septic-safe tank treatments: Add these after dumping to control odors and help break down waste.
Having everything organized in a dedicated tote or bin keeps your sewer gear ready and separate from other supplies. For more packing and organization tips, check out:

Aerotrunk Compression Packing Cubes for Travel, , Beige Review — A Aerotrunk pick in Packing Organizers that focuses on real-world usability Key figures include 2PCS, 4 PCS, 50.
Levelers: Keeping Your RV Steady During Dumping
Leveling your RV is important for comfort, but it’s also crucial during dumping. Tanks drain more completely when your RV is level or slightly sloped toward the sewer outlet. Uneven ground can leave waste behind, leading to odors and inaccurate tank readings. Portable leveling blocks or ramps are easy to use and store, and many modern RVs come with built-in leveling systems, but it’s always wise to carry a set of manual levelers just in case.
- Before dumping, double-check that your RV is stable and not likely to move during the process.
- For sites with a steep grade, position your RV so the sewer outlet is at the lowest point.
Proper leveling also helps with shower and sink drainage, avoiding standing water in your gray tank.
Coolers: The Overlooked Dump-Station Companion
It might sound odd, but a good cooler can make dump-station days more pleasant. If you’re waiting in line, a cooler with cold drinks keeps everyone hydrated — especially on hot summer days. Some campers also use a small cooler to store cleaning supplies or extra gloves, keeping them handy but separate from food items.
For those combining dump-station chores with a travel day, packing a cooler with snacks or lunch can save time and help you avoid the temptation of fast food stops. Look for a durable, easy-to-clean cooler that fits your storage space and travel style.
For more on keeping your gear organized and your essentials fresh, explore our camper gear resources:
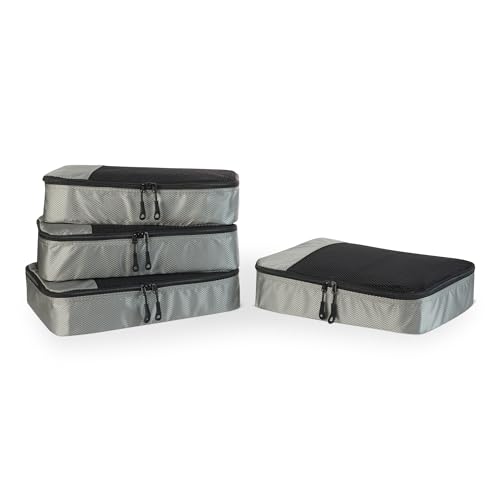
Amazon Essentials Packing Cubes Travel Accessories Set Review — Amazon Essentials packing organizers gear aimed at buyers who want clear specs before they click through. Key figures include 13.75, 9.75, 4 .
Preventing and Dealing with Clogs
Clogs are one of the most dreaded RV sewer issues, but they’re preventable with a few habits. Always use RV-safe toilet paper, and avoid flushing anything other than waste and paper. Regularly add tank treatments to help break down solids and control odors. When dumping, always empty the black tank first, then the gray tank, as the soapy gray water helps rinse the hose.
If you encounter a clog, don’t panic. Many RVers carry a tank wand or flush valve that connects to a hose for cleaning out stubborn blockages. Some sewer hoses come with built-in flush features. If problems persist, check for kinks or collapsed sections in your hose and inspect your tank valves for debris.
- Tip: Never leave your black tank valve open at a full-hookup site — this can lead to “pyramid plugs” from solids building up.
Cleaning and Storing Your Sewer Gear
Proper cleaning and storage prolong the life of your sewer hose and tote and keep your RV smelling fresh. After each use, rinse your hose thoroughly with non-potable water. Let the hose drain fully before collapsing and storing it. If you use a tote, rinse it out and let it dry before putting it away.
Store your sewer gear in a dedicated compartment or plastic bin, separate from drinking water hoses and items. Some campers add a scoop of baking soda or tank treatment to the hose compartment to control odors. Inspect hoses and fittings regularly for cracks or leaks and replace them as needed to prevent unpleasant surprises on your next trip.
Looking for more tips on keeping your rig clean and functional? Explore practical hygiene solutions:

Ann Katy Upgrade XL Portable Toilet for Adults Review — Practical hygiene & sanitation from Ann Katy, summarized from hub features and listed measurements. Key figures include 15.7 inches, 3.15, 15.
What to Do When Things Go Wrong
Despite your best efforts, accidents can happen: a hose pops loose, a tote leaks, or you misjudge the tank level. First, stay calm. Most spills are minor and can be cleaned up quickly with water and disinfectant. Always carry extra gloves, paper towels, and a small bottle of bleach or disinfecting spray for emergencies.
If a major spill occurs, alert campground staff if you’re in a public area. Never try to bury or cover up a sewage spill. Thoroughly rinse the area and yourself, and replace any gear that can’t be sanitized. Keeping your sewer setup in good condition and double-checking connections before dumping can help prevent most mishaps.
RV Dumping With Kids or Pets in Tow
Traveling with family means extra hands (and distractions) during dump-station stops. Keep kids and pets safely away from the work area, as dump stations can be hazardous. Assign roles: one adult manages the hose and valves, while another keeps an eye on children or pets. Older kids can help by fetching supplies or monitoring the water hose, but always supervise closely.
Bring a small step stool for younger helpers who want to observe but can’t reach. Make dump-station visits a learning opportunity about cleanliness and environmental responsibility — but never let children handle waste directly. For pet owners, keep leashes short and pets secured during the process to avoid accidents or escapes.
Frequently Asked Questions About RV Sewer Hoses and Totes
- How often should I replace my sewer hose? Most hoses last 1-3 years, depending on use and storage. Replace at the first sign of cracks, leaks, or stiffness.
- Can I use a regular garden hose for cleaning my sewer hose? Only if it’s dedicated solely to that purpose and clearly labeled — never use it for drinking water.
- How do I know what size tote to buy? Match or slightly exceed your black tank’s capacity. Remember, a full tote can be heavy — choose a size you can handle safely.
- Are there alternatives to using a dump station? Some campgrounds offer “honey wagon” services where they pump out your tanks for a fee. Otherwise, a portable tote is your best option when full hookups aren’t available.
Recap: Making Dump-Station Days Routine
With a well-chosen sewer hose, a reliable waste tote, and the right accessories, dump-station days become just another part of your RV routine. Preparation and organization are key — keep your gear clean, practice good etiquette, and don’t forget the small comforts like a cold drink or an organized storage bin. For more essential camper gear, check out our main camper gear hub for practical guides and product reviews.
By following these basics, you’ll spend less time worrying about waste and more time enjoying the open road. Safe travels and happy camping!
RV Sewer Hose and Tote Checklist
Being prepared before you pull up to the dump station can save you time, hassle, and mess. Use this checklist to make sure you have everything you need for a smooth dumping experience, whether you’re emptying at a campground or using a portable tote:
- Heavy-duty sewer hose (correct length for your setup)
- Clear elbow adapter (to monitor waste flow)
- Hose supports (for proper drainage on uneven ground)
- Disposable gloves (nitrile or latex, keep extras on hand)
- Dedicated cleaning hose (for rinsing only, not potable water)
- Portable waste tote (if camping without full hookups)
- Septic-safe tank treatment (to add after dumping)
- Dedicated storage container or tote (to keep sewer gear separate)
- Spare hose seals and gaskets (in case of leaks or wear)
- Hand sanitizer and cleaning wipes (for quick cleanup)
- Old towel or mat (to stand on while dumping)
- Protective eyewear (optional, for splash protection)
Double-check your gear before each trip so you’re never caught off guard at the dump station.
Common Dumping Mistakes to Avoid
Even seasoned RVers can make a mess at the dump station if they’re not careful. Here are some of the most frequent mistakes — and how to avoid them:
- Not securing hose connections: Always double-check that both ends of your sewer hose are tightly connected before opening any tank valves. A loose connection can mean a very unpleasant spill.
- Dumping tanks out of order: Always empty the black tank first and then the gray. The gray water helps flush out any remaining solids from the hose.
- Using the wrong hose for rinsing: Never use your potable water hose for rinsing the sewer hose or tote. Cross-contamination is a real risk.
- Ignoring signs of wear: Cracks, pinholes, or loose fittings can cause leaks. Inspect hoses and connections regularly and replace them at the first sign of trouble.
- Leaving valves open at full-hookup sites: Keeping the black tank valve open can lead to clogs and “pyramiding.” Wait until the tank is at least two-thirds full before dumping.
- Forgetting to rinse the hose or tote: Rinsing thoroughly after every use prevents odors and buildup that can shorten the lifespan of your gear.
By staying vigilant and developing a routine, you’ll avoid most dumping disasters and keep your RV’s waste system in top shape.
Maintaining Your Sewer Hose and Tote
Proper care extends the life of your sewer hose and portable tote, saving you money and headaches down the road. Here’s how to keep your gear in great condition:
- Rinse after every use: Always flush your hose and tote thoroughly with non-potable water at the dump station. This removes solids and prevents odors from building up.
- Dry before storage: Collapse the hose fully and let it drain. If possible, allow it to air-dry before storing to prevent mold and mildew.
- Inspect for damage: Regularly check for cracks, punctures, or worn fittings. Replace hoses or seals as needed to prevent leaks.
- Store separately: Keep sewer gear in its own compartment or bin, away from fresh water supplies and food items.
- Lubricate seals: Apply a silicone lubricant to rubber seals and gaskets periodically to keep them flexible and leak-proof.
- Sanitize occasionally: Every few trips, sanitize your hose and tote using a mild bleach solution or a product specifically designed for RV sanitation. Rinse thoroughly afterward.
- Protect from UV exposure: When not in use, store hoses and totes out of direct sunlight to prevent material breakdown.
Routine maintenance doesn’t take long but pays off in reliability and peace of mind at the dump station.
RV Sewer Hose and Tote FAQ
How often should I replace my sewer hose?
Most quality hoses last 2–5 years, depending on usage and care. Replace immediately if you notice cracks, leaks, or excessive wear. Frequent travelers might need to replace hoses more often than occasional campers.
Can I use any sewer hose with any RV?
Most RV sewer outlets use a standard 3-inch fitting, but always double-check compatibility with your specific rig and any accessories you use (like clear elbows or totes). Some smaller trailers or older RVs may require adapters.
Is it safe to store my sewer hose inside my RV?
It’s best to store your sewer hose in a dedicated, exterior compartment or a sealed tote to avoid cross-contamination. Never store sewer equipment near drinking water hoses or food.
What should I do if my tote or hose develops an odor?
Persistent odors usually mean waste residue is trapped inside. Thoroughly rinse and sanitize your hose and tote after use. Adding a septic-safe tank treatment after dumping can also help control odors.
What do I do if there’s a spill at the dump station?
If you spill, use water from the dump station’s rinse hose to wash the area thoroughly. Always clean up after yourself out of courtesy for other campers and to comply with campground rules.
How do I transport a full portable waste tote?
Move the tote slowly and carefully, using built-in handles or tow brackets if available. Avoid overfilling, as a full tote can be very heavy and harder to control, especially on rough terrain.
Can I dump my tanks at home?
Check local regulations before dumping at home. Some municipalities prohibit dumping RV waste into residential sewer systems. If allowed, use a designated clean-out port and always follow safe, sanitary procedures.
What’s the best way to keep gloves and cleaning supplies handy?
Store gloves, wipes, and sanitizer in a sealable plastic container or bin within your sewer storage compartment. This keeps everything organized and ready for quick access when you arrive at the dump station.
Tips for First-Time Dumpers
If you’re new to RVing or just tackling your first dump-station visit, a little preparation goes a long way. Here are a few tips for beginners:
- Watch a few online walkthrough videos to see the process in action.
- Do a “dry run” at home with clean water to get comfortable connecting and disconnecting your hose and tote.
- Take your time, and don’t be afraid to ask a seasoned RVer for help if you’re unsure.
- Keep a checklist handy until you develop your own routine and confidence.
- Remember: everyone was a beginner once — it gets easier with practice!
Our content is researched and drafted with AI assistance and reviewed by our team. Product details come from published specs, manufacturer information and owner reviews.